七、图结构
7.1 图的简介
图是什么?
-
是一种与有些的数据结构
-
是数学的一个,而且在数学中,的一种
-
图论以,研究组成的的数学
-
主要研究目的如下:系,顶点代表,边代表
图的特点
-
一组:通常用的集合
-
一组:通常用的集合
-
之间的连线
-
边可以是是的,也可以的。比如 ,
-
图中常用术语
-
顶点:表示图中的;
-
边:表示连间的连接;
-
相邻顶点:由的顶点称为;
-
度:顶点度是;
-
路径:
-
:路径要求简单的顶点;
-
:路径称为回路;
-
-
无向图:图中的一切的;
-
向图:图中的一切的;
-
无权图:中的边;
-
带权图:中的边
7.2 图的表示
邻接矩阵
表示图的常用方法是:。
-
可以使用表示邻接矩阵;
-
邻接矩阵让相关联,该值;
-
使用一个来表示;
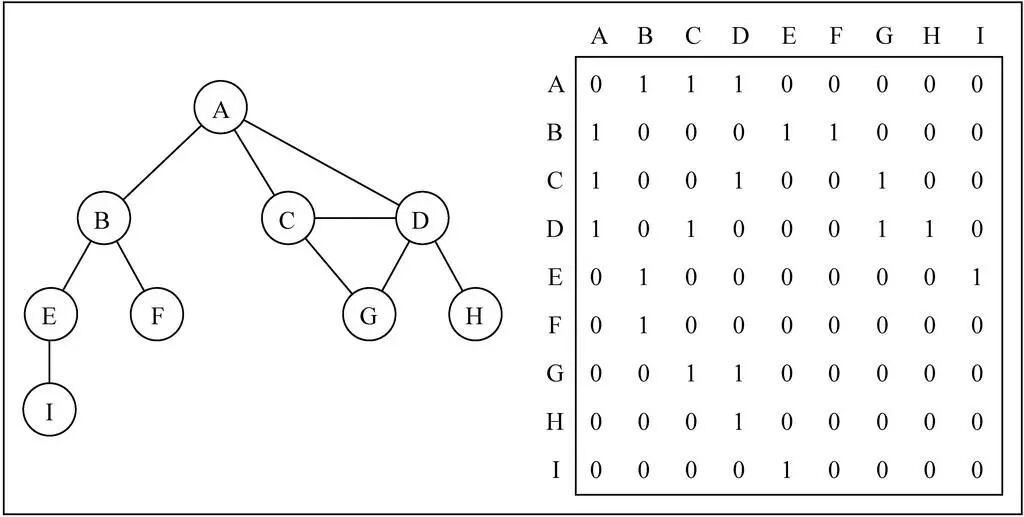
如上图所示:
-
二维数组,;
-
如:,表示 A 和 C 之间有;
-
邻接矩阵的,表示都(与自己没有联系);
-
若为,则;
邻接矩阵的问题
若图为一,然后邻接矩阵中将,造成**浪费存储空间 **
邻接表
另一种常用的表示图方式是:。
-
图中有邻接表组成;
-
这个列表是可用的,比如:**数组/链表/字典(哈希表)**等都可以;
![AMMKaTeX parse error: Expected 'EOF', got '}' at position 1: }?5Y5H(`J5JP4EHG}…}5Y5H(`J5JP4EHG}V]Y.jpg&originHeight=632&originWidth=1024&originalType=binary&ratio=1&rotation=0&showTitle=false&size=40721&status=done&style=none&taskId=u300123d3-932d-408e-a18d-c81e420def0&title=&width=540)
如上图所示:
-
图中可清晰看到,如果要表示这些与A顶点相邻的顶点(边),可以通过
-
之后,通过取出相应的数据非常方便;
邻接表的问题
-
邻接表可以简单得到,也就是说,一个顶点指向其他顶点的数量;
-
但是,计算邻接表(指向某一顶点的其他顶点的数量称为该顶点的入度)非常困难。此时需要结构有效计算入度;
7.3 封装图结构
在实现过程中使用表示边的方式,使用存储邻接表
添加字典类和队列类
首先,需要引入以前实现的字典和队列
///包装字典 function Dictionary() {
         //字典属性 this.items = {
         } //字典操作方法 //一.在字典中添加键值对 Dictionary.prototype.set = function (key, value) {
          this.items[key] = value } //二.判断字典中是否有某个key Dictionary.prototype.has = function (key) {
          return this.items.hasOwnProperty(key) } //三.从字典中移除元素 Dictionary.prototype.remove = function (key) {
          //1.判断字典中是否有这个key if (!this.has(key)) return false //2.从字典中删除key delete this.items[key] return true } //四.根据key获取value Dictionary.prototype.get = function (key) {
          return this.has(key) ? this.items[key] : undefined } //五.获取所有keys Dictionary.prototype.keys = function () {
          return Object.keys(this.items) } //六.size方法 Dictionary.prototype.keys = function () {
          return this.keys().length } //七.clear方法 Dictionary.prototype.clear = function () {
          this.items = {
         } } } //封装队列类 function Queue() {
          //属性 this.items = [] //方法 //1.enqueue Queue.prototype.enqueue = (element) => {
          this.items.push(element) } //2.dequeue Queue.prototype.dequeue = () => {
          return this.items.shift() } //3.front Queue.prototype.front = () => {
          return this.items[0] } //4.isEmpty Queue.prototype.isEmpty = () => {
          return this.items.length === 0 } //5.size Queue.prototype.size = () => {
          return this.items.length } //6.toString Queue.prototype.toString = () => {
          return this.items.join('') } }
创建图类
function Graph (){

  //属性:顶点(数组)/边(字典)
  this.vertexes = []//顶点
  this.edges = new Dictionary()//边
}
添加顶点与边
创建一个;创建一个,其中,。 代码实现:
Graph.prototype.addVertex = function (v) {

  this.vertexes.push(v)
  this.edges.set(v, [])
}
Graph.prototype.addEdge = (v1,v2){

  this.edges.get(v1).push(v2)
  this.edges.get(v2).push(v1)
}
测试代码:
let graph = new Graph()
let myVertexes = ['A', 'B', 'C', 'D', 'E', 'F', 'G', 'H', 'I']
for (let i = 0; i < myVertexes.length; i++) {

  graph.addVertex(myVertexes[i])
}
graph.addEdge('A', 'B');
graph.addEdge('A', 'C');
graph.addEdge('A', 'D');
graph.addEdge('C', 'D');
graph.addEdge('C', 'G');
graph.addEdge('D', 'G');
graph.addEdge('D', 'H');
graph.addEdge('B', 'E');
graph.addEdge('B', 'F');
graph.addEdge('E', 'I');
console.log(graph)
测试结果:


转换为字符串输出
为图类Graph添加
代码实现:
Graph.prototype.toString = () => {

  let resultString = ''
  for (let i = 0; i < this.vertexes.length; i++) {

    resultString += this.vertexes[i] + ' ---> '
    let vEdge = this.edges.get(this.vertexes[i])
    for (let j = 0; j < vEdge.length; j++) {

      resultString += vEdge[j] + ' '
    }
    resultString += '\n'
  }
  return resultString
}
测试代码:
console.log(graph.toString())
测试结果:

图的遍历
-
图的遍历思想:
- 图的遍历思想与树的遍历思想一样,意味着需要
-
遍历图的两种算法
-
两种遍历算法都需要
-
为了记录顶点是否被访问过,使用三种颜色来表示他们的状态
-
白色:表示该顶点还访问过
-
灰色:表示该顶点访问过,但其顶点访问过
-
黑色:表示该顶点过,且其相邻顶点都过
-
首先封装initializeColor方法,将图中所有顶点初始化为白色,代码实现如下
Graph.prototype.initializeColor = () => {

  let colors = []
  for (let i = 0; i < this.vertexes.length; i++) {

    colors[this.vertexes[i]] = 'white'
  }
  return colors
}
广度优先搜索
广度优先搜索算法会从指定的,先,就像一次访问图的一层
也可以说是的遍历图中的各个顶点
![5MHP8)ZKaTeX parse error: Expected 'EOF', got '#' at position 99: …39837afea8.jpeg#̲clientId=ua8b1b…GPW1IF`B0TG4XYW.jpg&originHeight=687&originWidth=1024&originalType=binary&ratio=1&rotation=0&showTitle=false&size=48469&status=done&style=none&taskId=u77ca0b46-99a1-4fe0-8144-db7da85ab44&title=)
实现思路:
基于队列可以简单地实现广度优先搜索算法:
-
首先创建一个;
-
调用封装的
initializeColor方法将所有; -
指定,将A标注为(被访问过的节点),并将A放入队列Q中;
-
循环遍历队列中的元素,只要队列Q非空,就执行以下操作:
-
先将出;
-
取出A后,将依次从队列。以此保证,灰色的相邻顶点不重复加入队列;
-
A的节点加入Q后,,在下一次循环中被
-
代码实现:
Graph.prototype.bfs = (initV, handler) => {

  let colors = this.initializeColor()
  let que = new Queue()
  que.enqueue(initV)
  while(!que.isEmpty()){

    let v = que.dequeue()
    let vNeighbours = this.edges.get(v)
    colors[v] = 'gray'
    for (let i = 0; i < vNeighbours.length; i++) {

      const a = vNeighbours[i]
      if(colors[a] == 'white'){

        colors[a] = 'gray'
        que.enqueue(a)
      }
    }
    handler(v)
    colors[v] = 'black'
  }
}
测试代码:
//4.测试bfs遍历方法
let result = ""
graph.bfs(graph.vertexes[0], function(v){

  result += v + "-"
})
console.log(result);
测试结果:

深度优先搜索
深度优先搜索算法会从指定的,沿着
接着,并

实现思路:
-
可以使用深度优先搜索算法;
-
深度优先搜索算法的遍历顺序与二叉搜索树中的先序遍历较为相似,同样可以(递归的本质就是函数栈的调用)。
-
基于递归实现深度优先搜索算法:定义用于调用递归,定义用于。
-
在中:
-
首先,调用;
-
然后,调用;
-
-
在中:
- 首先,将传入的指定节点**v标注为灰色;
**
-
接着,;
-
然后,访问;
-
最后,将顶点;
代码实现:
Graph.prototype.bfs = (initV, handler) => {

  let colors = this.initializeColor()
  let que = new Queue()
  que.enqueue(initV)
  while(!que.isEmpty()){

    let v = que.dequeue()
    let vNeighbours = this.edges.get(v)
    colors[v] = 'gray'
    for (let i = 0; i < vNeighbours.length; i++) {

      const a = vNeighbours[i]
      if(colors[a] == 'white'){

        colors[a] = 'gray'
        que.enqueue(a)
      }
    }
    handler(v)
    colors[v] = 'black'
  }
}
测试代码:
//4.测试bfs遍历方法
let result = ""
graph.dfs(graph.vertexes[0], function(v){

  result += v + "-"
})
console.log(result);
测试结果:

完整实现
function Graph() { //属性:顶点(数组)/边(字典) this.vertexes = []//顶点 this.edges = new Dictionary()//边 Graph.prototype.addVertex = function (v) { this.vertexes.push(v) this.edges.set(v, []) } Graph.prototype.addEdge = (v1, v2) => { this.edges.get(v1).push(v2) this.edges.get(v2).push(v1) } Graph.prototype.toString = () => { let resultString = '' for (let i = 0; i < this.vertexes.length; i++) { resultString += this.vertexes[i] + ' ---> ' let vEdge = this.edges.get(this.vertexes[i]) for (let j = 0; j < vEdge.length; j++) { resultString += vEdge[j] + ' ' } resultString += '\n' } return resultString } Graph.prototype.initializeColor = () => { let colors = [] for (let i = 0; i < this.vertexes.length; i++) { colors[this.vertexes[i]] = 'white' } return colors } Graph.prototype.bfs = (initV, handler) => { let colors = this.initializeColor() let que = new Queue() que.enqueue(initV) while (!que.isEmpty()) { let v = que.dequeue() let vNeighbours = this.edges.get(v) colors[v] = 'gray' for (let i = 0; i < vNeighbours.length; i++) { const a = vNeighbours[i] if (colors[a] == 'white') { colors[a] = 'gray' que.enqueue 标签:集成电路lm2575hvn