微信微信官方账号:运维发展故事,作者:double冬
背景
容器技术的最佳实践之一是尽可能简化容器镜像。然而,这一实践会给调查问题带来麻烦:精简容器中常用的障碍物排除工具普遍缺失,有些容器甚至没有 shell (比如 FROM scratch )。 在这种情况下,我们只能通过日志或宿主机 docker-cli 或 nsenter 调查问题的效率很低K8s环境部署应用后,经常需要进入pod进行排错。除了查看pod logs和describe除了业务,传统的解决方案是pod提前安装基础镜像procps、net-tools、tcpdump、vim等工具。但这既不符合最小化镜像的原则,也不符合最小化镜像的原则Pod安全漏洞风险。
今日推荐一款K8s pod诊断工具,kubectl-debug简单、易用、强大 kubectl 插件, 它可以帮助你方便地进行 Kubernetes 上的 Pod 排障诊断。启动排错工具容器,并将其添加到目标业务容器中pid, network, user 以及 ipc namespace 此时,我们可以直接在新容器中使用 netstat, tcpdump 这些熟悉的工具来解决问题, 业务容器可以最小化, 无需预装任何额外的排障工具。 kubectl-debug 主要包括以下两部分:
-
kubectl-debug:命令行工具
-
debug-agent:部署在K8s的node用于启动关联排错工具容器
工作原理
众所周知,容器本质上是有的 cgroup 资源限制和 namespace 一组隔离过程。因此,我们只需要启动一个过程,并将其添加到目标容器中 namespace 这个过程就可以了 进入容器(注意引号),看到与容器中的过程相同的根文件系统、虚拟网卡和过程空间——这也是 docker exec 和 kubectl exec 等待命令的操作。
现在的情况是,我们不仅要 进入容器也希望带一套工具来帮助调查问题。然后,如果你想有效地管理一套工具集,并且可以跨平台,最好的方法是将工具本身包装在容器镜像中。 接下来,我们只需要通过这个工具镜像启动容器,然后指定各种添加到目标容器中的容器 namespace,自然实现 携带一套工具集进入容器。事实上,使用 docker-cli 此操作可实现:
export TARGET_ID=666666666 # 加入目标容器 network, pid 以及 ipc namespace docker run -it --network=container:$TARGET_ID --pid=container:$TARGET_ID --ipc=container:$TARGET_ID busybox 这就是 kubectl-debug 的出发点: 用工具容器诊断业务容器 。背后的设计理念和 sidecar 等待模式:每个容器只做一件事。
具体到实现,一个 kubectl debug命令背后的逻辑过程如下:
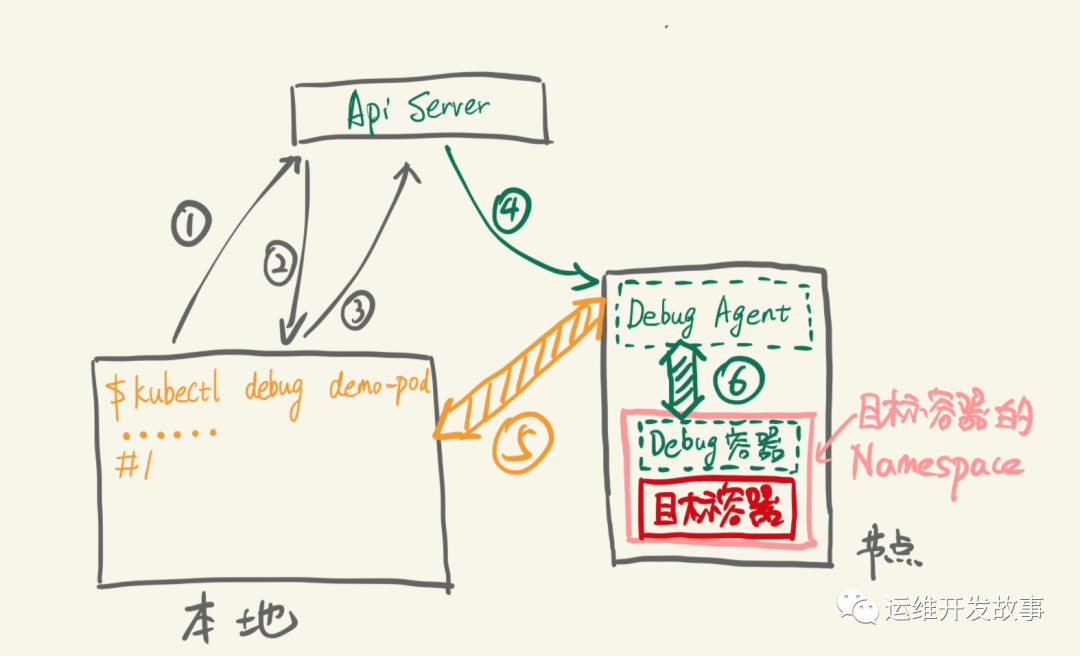
img
步骤如下:
-
插件查询 ApiServer:demo-pod 是否存在,节点是什么?
-
ApiServer 返回 demo-pod 节点所在
-
目标节点创建插件请求 Debug Agent Pod
-
Kubelet 创建 Debug Agent Pod
-
插件发现 Debug Agent 已经 Ready,发起 debug 请求(长连接)
-
Debug Agent 收到 debug 请求,创建 Debug 加入目标容器的每个容器 Namespace 创建完成后,和 Debug 容器的 tty 建立连接
接下来,客户端可以通过 5,6 这两个连接开始了 debug 操作。操作结束后,Debug Agent 清理 Debug 清理容器和插件 Debug Agent,一次 Debug 完成
安装
github地址:https://github.com/aylei/kubectl-debug
- Mac 可直接使用 brew 安装
brew install aylei/tap/kubectl-debug - 安装二进制文件
export PLUGIN_VERSION=0.1.1 # linux x86_64 curl -Lo kubectl-debug.tar.gz https://github.com/aylei/kubectl-debug/releases/download/v${PLUGIN_VERSION}/kubectl-debug_${PLUGIN_VERSION}_linux_amd64.tar.gz # macos curl -Lo kubectl-debug.tar.gz https://github.com/aylei/kubectl-debug/releases/download/v${PLUGIN_VERSION}/kubectl-debug_${PLUGIN_VERSION}_darwin_amd64.tar.gz tar -zxvf kubectl-debug.tar.gz kubectl-debug sudo mv kubectl-debug /usr/local/bin/ Windows 用户可以在Release 页面选择下载windows加入环境变量使用版本
其中github上有提供debug agent以DaemonSet集群中安装了方式,但是daemonset模式,agent pod所有预先部署node总会占用资源,浪费资源造成排错调试频率低的环境。
日常用法说明
简单使用
1、kubectl 1.12.0 或更高的版本, 可直接使用
#查看常用命令参数 kubectl debug -h kubectl 从 1.12 版本之后开始支持从 PATH 插件自动发现.12 版本之前的 kubectl 这种插件机制不支持,但也可以命令名称 kubectl-debug 直接调用。
假如安装了 debug-agent 的 daemonset, 可以略去 --agentless 加快启动速度,稍后的命令将被删除 --agentless
kubectl debug POD_NAME --daemonset-ns=default --daemonset-name=debug-agent 其中github上有提供debug agent以DaemonSet集群中安装了方式,但是daemonset模式,agent pod所有预先部署node对于排错调试频率低的环境,总会占用资源,造成资源浪费,部署方式:kubectl apply -f https://raw.githubusercontent.com/aylei/kubectl-debug/master/scripts/agent_daemonset.yml
3、agentless模式,kubectl-debug执行命令后才创建agent pod和排错工具容器,退出后删除工具容器和agent pod。因为每次执行都要重新拉起来agent,启动会比daemon-set模式稍慢-a, --agentless开启agentless模式:
kubectl debug POD_NAME --agentless --port-forward 4、假如 Node 没有公网 IP 或无法直接访问(防火墙等原因), 请使用 port-forward 模式
kubectl debug POD_NAME --agentless --port-forward 进阶使用
1、排错init-container
kubectl debug POD_NAME --container=init-pod 2、假如 Pod 处于 CrashLookBackoff 状态不能连接, 可以复制一个完全相同的 Pod 来进行诊断
kubectl debug POD_NAME --fork 自定义镜像配置
--image:可定制错误工具容器镜像,改为私有镜像仓库,默认为nicolaka/netshoot:latest --agent-image:在agentless自定义模式下debug-agent镜像,默认为aylei/debug-agent:latest。在daemon-set在模式下,直接将debug-agent daemonset pod template修改为私有仓库镜像即可 配置文件
~/.kube/debug-config,通过配置文件修改默认参数,免去使用命令时设置flag。
# debug agent listening port(outside container)
default to 10027
agentPort: 10027
whether using agentless mode
default to false
agentless: true
namespace of debug-agent pod, used in agentless mode
default to 'default'
agentPodNamespace: default
prefix of debug-agent pod, used in agentless mode
default to  'debug-agent-pod'
agentPodNamePrefix: debug-agent-pod
image of debug-agent pod, used in agentless mode
default to 'aylei/debug-agent:latest'
agentImage: aylei/debug-agent:latest
daemonset name of the debug-agent, used in port-forward
default to 'debug-agent'
debugAgentDaemonset: debug-agent
daemonset namespace of the debug-agent, used in port-forwad
default to 'default'
debugAgentNamespace: kube-system
whether using port-forward when connecting debug-agent
default false
portForward: true
image of the debug container
default as showed
image: nicolaka/netshoot:latest
start command of the debug container
default ['bash']
command:
- '/bin/bash'
- '-l'
典型案例
使用 查看pod的网络流量
比如查看POD_NAME是kube-flannel-ds-amd64-2xwqp的网络流量:
~ kubectl debug kube-flannel-ds-amd64-2xwqp -n kube-system
Agent Pod info: [Name:debug-agent-pod-b14bd868-61a9-11ec-bc72-acbc328370f3, Namespace:default, Image:registry.cn-hangzhou.aliyuncs.com/querycapimages/kubectl-debug-agent:latest, HostPort:10027, ContainerPort:10027]
Waiting for pod debug-agent-pod-b14bd868-61a9-11ec-bc72-acbc328370f3 to run...
Forwarding from 127.0.0.1:10027 -> 10027
Forwarding from [::1]:10027 -> 10027
Handling connection for 10027
set container procfs correct false ..
pulling image registry.cn-hangzhou.aliyuncs.com/querycapimages/netshoot:latest, skip TLS false...
latest: Pulling from querycapimages/netshoot
Digest: sha256:f0eba49c9bf66600788d58779e57c2d7334708e12cb292ff8ccc9414c1b6730c
Status: Image is up to date for registry.cn-hangzhou.aliyuncs.com/querycapimages/netshoot:latest
starting debug container...
container created, open tty...
bash-5.0# iftop -i eth0
interface: eth0
IP address is: 172.17.3.3
MAC address is: 52:54:be:83:3a:e4
使用 诊断 DNS 解析
比如查看POD_NAME是kube-flannel-ds-amd64-2xwqp的网络流量:
bash-5.0# drill any www.baidu.com
;; ->>HEADER<<- opcode: QUERY, rcode: NOERROR, id: 3214
;; flags: qr rd ra ; QUERY: 1, ANSWER: 1, AUTHORITY: 5, ADDITIONAL: 3
;; QUESTION SECTION:
;; www.baidu.com. IN ANY

;; ANSWER SECTION:
www.baidu.com. 803 IN CNAME www.a.shifen.com.

;; AUTHORITY SECTION:
baidu.com. 38993 IN NS ns4.baidu.com.
baidu.com. 38993 IN NS ns3.baidu.com.
baidu.com. 38993 IN NS ns7.baidu.com.
baidu.com. 38993 IN NS dns.baidu.com.
baidu.com. 38993 IN NS ns2.baidu.com.

;; ADDITIONAL SECTION:
ns2.baidu.com. 19348 IN A 220.181.33.31
ns3.baidu.com. 23022 IN A 112.80.248.64
ns7.baidu.com. 20697 IN A 180.76.76.92

;; Query time: 1 msec
;; SERVER: 100.64.9.5
;; WHEN: Mon Dec 20 15:37:35 2021
;; MSG SIZE  rcvd: 196
drill 命令详解:https://commandnotfound.cn/linux/1/533/drill-%E5%91%BD%E4%BB%A4
使用 抓包
比如查看POD_NAME是kube-flannel-ds-amd64-2xwqp的网络流量:
bash-5.0# tcpdump -i eth0 -c 1 -Xvv
tcpdump: listening on eth0, link-type EN10MB (Ethernet), capture size 262144 bytes
15:39:27.577342 IP (tos 0x0, ttl 63, id 41476, offset 0, flags [DF], proto TCP (6), length 89)
    198.19.116.60.16710 > 172.17.3.3.6443: Flags [P.], cksum 0xf831 (correct), seq 677521811:677521848, ack 1388710574, win 1037, options [nop,nop,TS val 2849535414 ecr 1924260089], length 37
 0x0000:  4500 0059 a204 4000 3f06 b036 c613 743c  E..Y..@.?..6..t<
 0x0010:  ac11 0303 4146 192b 2862 2993 52c6 0aae  ....AF.+(b).R...
 0x0020:  8018 040d f831 0000 0101 080a a9d8 75b6  .....1........u.
 0x0030:  72b1 e0f9 1703 0300 2047 49f1 8fbb 2835  r........GI...(5
 0x0040:  059a 5e82 0746 afaf bd2d 5af3 c797 16b5  ..^..F...-Z.....
 0x0050:  8709 4666 7e61 6f5a 0b                   ..Ff~aoZ.
1 packet captured
18 packets received by filter
0 packets dropped by kernel
bash-5.0# tcpdump -n -vvv -w /tmp/kube-flannel-ds-amd64-2xwqp.pcap
tcpdump: listening on veth19416cac, link-type EN10MB (Ethernet), capture size 262144 bytes
50 packets captured
50 packets received by filter
0 packets dropped by kernel
这里需要注意,如果是想拿到-w抓包保存的文件用wireshark工具分析,则需要去POD_NAME对应的宿主机上拷贝出来进行分析
[root@k8s-demo-master-01-2 ~]# docker ps |grep netshoot
58b918b67b3f        registry.cn-hangzhou.aliyuncs.com/querycapimages/netshoot:latest       "bash"                   15 minutes ago      Up 15 minutes                           unruffled_fermat
[root@k8s-demo-master-01-2 ~]# docker cp 58b918b67b3f:/tmp/kube-flannel-ds-amd64-2xwqp.pcap .
[root@k8s-demo-master-01-2 ~]# ll |grep kube-flannel-ds-amd64-2xwqp.pcap
-rw-r--r--  1 root root 5404 12月 20 23:41 kube-flannel-ds-amd64-2xwqp.pcap
诊断 CrashLoopBackoff
排查 CrashLoopBackoff 是一个很麻烦的问题,Pod 可能会不断重启, kubectl exec 和 kubectl debug 都没法稳定进行排查问题,基本上只能寄希望于 Pod 的日志中打印出了有用的信息。 为了让针对 CrashLoopBackoff 的排查更方便, kubectl-debug 参考 oc debug 命令,添加了一个 --fork 参数。当指定 --fork 时,插件会复制当前的 Pod Spec,做一些小修改, 再创建一个新 Pod:
-
新 Pod 的所有 Labels 会被删掉,避免 Service 将流量导到 fork 出的 Pod 上
-
新 Pod 的 ReadinessProbe 和 LivnessProbe 也会被移除,避免 kubelet 杀死 Pod
-
新 Pod 中目标容器(待排障的容器)的启动命令会被改写,避免新 Pod 继续 Crash
接下来,我们就可以在新 Pod 中尝试复现旧 Pod 中导致 Crash 的问题,示例pod_name为srv-es-driver-7445f6cf48-ff7bq的go服务。为了保证操作的一致性,可以先 chroot 到目标容器的根文件系统中:
~ kubectl-debug srv-es-driver-7445f6cf48-ff7bq -n devops --agentless --port-forward
Agent Pod info: [Name:debug-agent-pod-177482f4-61ad-11ec-b297-acbc328370f3, Namespace:default, Image:registry.cn-hangzhou.aliyuncs.com/querycapimages/kubectl-debug-agent:latest, HostPort:10027, ContainerPort:10027]
Waiting for pod debug-agent-pod-177482f4-61ad-11ec-b297-acbc328370f3 to run...
Forwarding from 127.0.0.1:10027 -> 10027
Forwarding from [::1]:10027 -> 10027
Handling connection for 10027
set container procfs correct false ..
pulling image registry.cn-hangzhou.aliyuncs.com/querycapimages/netshoot:latest, skip TLS false...
latest: Pulling from querycapimages/netshoot
Digest: sha256:f0eba49c9bf66600788d58779e57c2d7334708e12cb292ff8ccc9414c1b6730c
Status: Image is up to date for registry.cn-hangzhou.aliyuncs.com/querycapimages/netshoot:latest
starting debug container...
container created, open tty...
bash-5.0# ls
bin mnt sys
dev opt termshark_2.1.1_linux_x64
etc proc tmp
home root usr
lib run var
lib64 sbin
media srv
bash-5.0# chroot /proc/1/root
root@srv-es-driver-7445f6cf48-ff7bq:/# ls
bin dev go lib media opt root sbin sys usr
boot etc home lib64 mnt proc run srv tmp var
root@srv-es-driver-7445f6cf48-ff7bq:/# cd /go/bin/
root@srv-es-driver-7445f6cf48-ff7bq:/go/bin# ls
openapi.json srv-es-driver
root@srv-es-driver-7445f6cf48-ff7bq:/go/bin# ./srv-es-driver
# 观察执行启动脚本时的信息并根据信息进一步排障
自定义image作为sidercar安装命令行调试
对于没有安装yum,apt-get 的镜像可以挂载 centos或者ubuntu的sidercar镜像, 再进行操作, 如安装 redis 命令, 再使用redis-cli 命令
~ kubectl-debug srv-es-driver-7445f6cf48-ff7bq -n devops --agentless --port-forward --image centos
Agent Pod info: [Name:debug-agent-pod-f5077b08-61ad-11ec-8728-acbc328370f3, Namespace:default, Image:registry.cn-hangzhou.aliyuncs.com/querycapimages/kubectl-debug-agent:latest, HostPort:10027, ContainerPort:10027]
Waiting for pod debug-agent-pod-f5077b08-61ad-11ec-8728-acbc328370f3 to run...
Forwarding from 127.0.0.1:10027 -> 10027
Forwarding from [::1]:10027 -> 10027
Handling connection for 10027
set container procfs correct false ..
pulling image centos, skip TLS false...
latest: Pulling from library/centos
a1d0c7532777: Pull complete
Digest: sha256:a27fd8080b517143cbbbab9dfb7c8571c40d67d534bbdee55bd6c473f432b177
Status: Downloaded newer image for centos:latest
starting debug container...
container created, open tty...
[root@srv-es-driver-7445f6cf48-ff7bq /]# yum install -y redis
参考链接:
https://aleiwu.com/post/kubectl-debug-intro/
**:https://www.devopstory.cn**
我是冬子先生,《运维开发故事》公众号团队中的一员,一线运维农民工,云原生实践者,这里不仅有硬核的技术干货,还有我们对技术的思考和感悟,欢迎关注我们的公众号,期待和你一起成长!
[外链图片转存失败,源站可能有防盗链机制,建议将图片保存下来直接上传(img-WGZyqt0N-1642412583816)(https://mmbiz.qpic.cn/mmbiz_jpg/4XricCQ2YfK6Z3icUoVg98qibov1hRXIu1379ldia74V9fVkg412Gh0MCiaVvgpjzzqibkJGrX1c1RibLZnQbhRWqEGLw/640?wx_fmt=jpeg)]
扫码二维码
关注我,不定期维护优质内容
如果我的文章对你有所帮助,还请帮忙一下,你的支持会激励我输出更高质量的文章,非常感谢!
你还可以把我的公众号设为「」,这样当公众号文章更新时,你会在第一时间收到推送消息,避免错过我的文章更新。
........................