ads1118实现热电偶测温
文章目录
- ads1118实现热电偶测温
- 前言
- 一、什么是热电偶和测温原理?
- 二、热电偶测温过程
-
- 1.使用的基本公式和流程:
- 2.ADS1118读取数据:
- 3.温度转换
前言
ads118实现热电偶测温。内容包括:了解热电偶的基本原理;ads1118的adc转换及原理;实现电偶测试;滤波算法
一、什么是热电偶和测温原理?
热电偶测温采用热效应的原理。当有两种不同的导体或半导体A和B当两端相互连接时,只要两个节点之间的温度不同,就会形成一个电势,分别称为冷端和工作端。因此,为了实现一个完整的热电偶测量过程,我们需要测量工作端ADC冷端的温度值。
二、热电偶测温过程
1.用到的基本公式及基本流程:
2.ADS1118读取数据:
ADS1118的通讯接口是SPI,SPI的通讯原理及过程就不在这里赘述了。ADS1118内部集成东西比较多,内部温度、可编程运放、16位的ADC,并且设置过程比较简单,里面只有一个寄存器。 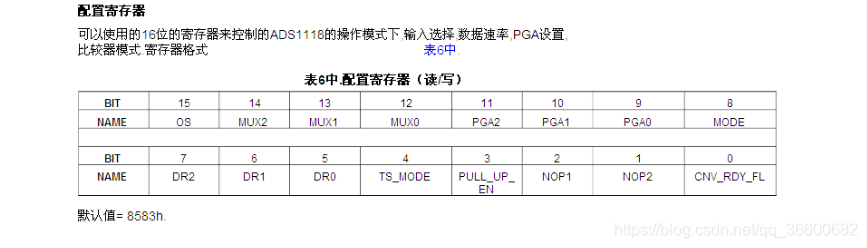实现代码如下:
//read once to get data
/********************************************************* * @function Ads1118_ReadData_one * @role 读取一组数据 * @input none * @output none * @return none ********************************************************/
void Ads1118_ReadData_one(unsigned int* ReadBDate)
{

	unsigned int temp,temp1,temp2;
	ads_spi_sck_off();
	ads1118_delay(10);
	ads_spi_cs_off();
	ads1118_delay(50);
	if(FistEn==1)//the fist time no data to conver
	{

		if(ads_spi_do()==1)while(ads_spi_do());
	}
	else
	{

		FistEn=1;
	}

	temp1=Ads_SpiReadU16(0x8ffb);//T command now is AD,and next is T
	//temp1=ReadU16(0x8f9b);//T command now is AD,and next is T
	ReadBDate[0]=temp1;
	ads_spi_cs_on();
	//temp=ReadU16(0xffff);
	ads1118_delay(50);


	ads_spi_sck_off();
	ads1118_delay(10);
	ads_spi_cs_off();
	if(ads_spi_do()==1)while(ads_spi_do());
	temp2=Ads_SpiReadU16(0x8feb);//AD command now is T,and next is AD 0x8feb
	//temp2=ReadU16(0x8f8b);//AD command now is T,and next is AD
	ReadBDate[1]=temp2;
	ads_spi_cs_on();

  ads1118_delay(50);

	ads_spi_sck_off();
	ads1118_delay(10);
	ads_spi_cs_off();
	if(ads_spi_do()==1)while(ads_spi_do());
	temp2=Ads_SpiReadU16(0xBfeb);//AD command now is T,and next is AD,start ant2
	ReadBDate[2]=temp2;
	ads_spi_cs_on();
}

/********************************************************* * @function Ads1118_ReadData * @role 读取一次数据 * @input none * @output 通道2的adc,内部温度,通道1的adc * @return none ********************************************************/
unsigned int Ads1118_ReadData(unsigned int* ReadBDate)
{

  char i ,j;
  int Data_1[DataCout];
  int Data_2[DataCout];
  int Data_3[DataCout];
  unsigned int TemData[3];

  long  temd;

	//unsigned int dataCou=20;

  for(i=0;i<DataCout;i++)
	{

		Ads1118_ReadData_one(TemData);
		Data_1[i] = TemData[0];
		Data_2[i] = TemData[1];
    Data_3[i] = TemData[2];
	}

	for(i=DataCout-1;i>0;i--)
	{

		for(j=0;j<i;j++)
		{

			if( Data_1[j+1] > Data_1[j] )
			{

				TemData[0]  =Data_1[j+1];
				Data_1[j+1] =Data_1[j];
				Data_1[j]   =TemData[0];
			}
		}
	}

	temd=0;
	for(i=0;i<(DataCout-6);i++)
	{

		temd+=(long ) Data_1[i+3];
	}

	ReadBDate[0]=temd/(DataCout-6);

	//ReadBDate[0]=Data_1[5];

	for(i=DataCout-1;i>0;i--)
	{

		for(j=0;j<i;j++)
		{

			if(Data_2[j+1]>Data_2[j])
			{

				TemData[1]  =Data_2[j+1];
				Data_2[j+1] =Data_2[j];
				Data_2[j]   =TemData[1];
			}
		}
	}


	temd=0;
	for(i=0;i<(DataCout-6);i++)
	{

		temd +=(long )Data_2[i+3];
	}

	ReadBDate[1]= temd/(DataCout-6)  ;

	for(i=DataCout-1;i>0;i--)
	{

		for(j=0;j<i;j++)
		{

			if(Data_3[j+1]>Data_3[j])
			{

				TemData[1]  =Data_3[j+1];
				Data_3[j+1] =Data_3[j];
				Data_3[j]   =TemData[1];
			}
		}
	}


	temd=0;
	for(i=0;i<(DataCout-6);i++)
	{

		temd +=(long )Data_3[i+3];
	}

	ReadBDate[2]= temd/(DataCout-6)  ;

	//ReadBDate[1]=Data_2[5];

	return 0;

}
3.温度转换
代码如下:
/********************************************************* * @function Conver_to_T * @role传感器热电偶温度转换 * @input none * @output none * @return none ********************************************************/ long Conver_to_T(unsigned int coldJT,unsigned int TU,unsigned char Dire) { unsigned int i;//,GetT; long GetT; unsigned int ColdJU,NewTU; ColdJU=ThermocoupleCV[(coldJT/100)+1]+(coldJT%100+1)*4/10;// (coldJT%100)/40*100 if(Dire)NewTU=ColdJU+TU; //positive voltage else //negative voltage { if(ColdJU>=TU) { NewTU=ColdJU-TU; } else { NewTU=TU-ColdJU; } } if(NewTU>50) { GetT=NewTU/50; } else { GetT=0; } if( (Dire==0) && (ColdJU<TU) ) //<0 { for(i=GetT;(NewTU>ThermocoupleCV_Cold[i]);i++); if(i==0) i++; GetT=i-1; GetT*=100; GetT+=( NewTU-ThermocoupleCV_Cold[i-1] )*100 / ( ThermocoupleCV_Cold[i]-ThermocoupleCV_Cold[i-1] ); //make it's valuse close to device only. It could be delete,if want to more close to real. GetT+=(i-1)/2; GetT+=50; // e=ax+y;a=0.5,b=0.5 //make it's valuse close to device return GetT; //real T*100 } else { for(i=GetT;(NewTU>ThermocoupleCV[i]);i++); if(i==0) i++; GetT=i-1; GetT*=100; GetT+=( NewTU-ThermocoupleCV[i-1] )*100 / ( ThermocoupleCV[i]-ThermocoupleCV[i-1] ); //make it's valuse close to device only. It could be delete,if want to more close to real. GetT+=(i-1)/100*10; if(GetT>=50)GetT-=50; // e=ax+y;a=1,b=-0.5 //make it's valuse close to device return GetT; //real T*100 } } /********************************************************* * @function RegValueToTemp * @role 传感器值转换最终温度 * @input none * @output none * @return none ********************************************************/ int RegValueToTemp(unsigned int RegValueCodeT,unsigned int RegValueADC) { unsigned int McoldJT=0,MJU=0,tem=0; int RealT=0; RegValueCodeT>>=2; RegValueCodeT&=0xfff0; tem=RegValueCodeT*3;//conver to T number *100 /* 数据只有14位且左对齐 0.03125约等于0.03 */ McoldJT=tem; if(RegValueADC&0x8000) { RegValueADC=~RegValueADC; RegValueADC=RegValueADC+2; RegValueADC&=0x7fff; // tem-=(long)RegValueADC*781/40; // tem-=5; // tem/=10; / negative voltage //new conver //McoldJT+=50; //McoldJT/=100; MJU=((long)RegValueADC*781+50)/100; RealT=Conver_to_T(McoldJT,MJU,0); //had real T*100 } else { // tem+=(long)RegValueADC*781/40;//AdData[0]*700/40 // tem+=5; // tem/=10; / //positive voltage //new conver //McoldJT+=50; //McoldJT/=100; MJU=((long)RegValueADC*781+50)/100; RealT=Conver_to_T(McoldJT,MJU,1); //had real T*100 } return RealT; }
最后附上stm32的spi驱动参考:
void ads1118_delay(unsigned char i)
{

  i=i*10;
	while(i--);
}

/********************************************************* * @function GpioCfg * @role 配置管脚 * @input none * @output none * @return none ********************************************************/
static void GpioCfg_out( GPIO_TypeDef* GPIO,uint32_t Pin)
{

  GPIO_InitTypeDef GPIO_InitStruct = {
        0};

  GPIO_InitStruct.Pin = Pin;
  GPIO_InitStruct.Mode = GPIO_MODE_OUTPUT_PP;
  GPIO_InitStruct.Pull = GPIO_PULLUP;
  GPIO_InitStruct.Speed = GPIO_SPEED_FREQ_LOW;
  HAL_GPIO_Init(GPIO, &GPIO_InitStruct);
}

/********************************************************* * @function GpioCfg * @role 配置管脚 * @input none * @output none * @return none ********************************************************/
static void GpioCfg_int( GPIO_TypeDef* GPIO,uint32_t Pin)
{

  GPIO_InitTypeDef GPIO_InitStruct = {
        0};

  GPIO_InitStruct.Pin = Pin;
  GPIO_InitStruct.Mode = GPIO_MODE_INPUT;
  GPIO_InitStruct.Pull = GPIO_PULLUP;
  GPIO_InitStruct.Speed = GPIO_SPEED_FREQ_LOW;
  HAL_GPIO_Init(GPIO, &GPIO_InitStruct);
}

/********************************************************* * @function ads1118_ioCnofig * @role 管脚配置初始化 * @input none * @output none * @return none ********************************************************/
void ads1118_ioCnofig(void)
{

  ADS_SPI_CS_PIN_CLK_EN();
  ADS_SPI_DI_PIN_CLK_EN();
	ADS_SPI_DO_PIN_CLK_EN();
  ADS_SPI_SCK_PIN_CLK_EN();

  GpioCfg_out(ADS_SPI_CS_PIN);
  GpioCfg_out(ADS_SPI_DO_PIN);
  GpioCfg_out(ADS_SPI_SCK_PIN);

  GpioCfg_int(ADS_SPI_DI_PIN);
}
/* #define ads_spi_cs P2.1 #define ads_spi_di P2.2 #define ads_spi_do P14.7 #define ads_spi_sck P2.0 */


/********************************************************* * @function Ads_SpiReadU16 * @role spi的时序 * @input none * @output none * @return none ********************************************************/
unsigned int Ads_SpiReadU16(unsigned int Cmd)
{

	char i;
	unsigned int temp=0;
	for(i=0;i<16;i++)
	{

		temp<<=1;
		ads_spi_sck_on();
		if(Cmd&0x8000)ads_spi_di_on();
		else ads_spi_di_off();
		ads1118_delay(10);
		ads_spi_sck_off();
		if(ads_spi_do())temp|=1;
		ads1118_delay(10);
		Cmd<<=1;
	}
	return temp;
}
最后要说明一下:我这里只加了中值滤波算法,实际产品中还会加入惯性滤波算法,使显示结果更加平稳。