一、vite2创建项目
兼容性注:Vite 需要 Node.js 版本 >= 12.0.0。
打开创建项目文件目录 cmd 操作以下命令
# npm 6.x npm init @vitejs/app projectName --template # npm 7 , 需要额外的双横线: npm init @vitejs/app projectName -- --template # yarn yarn create @vitejs/app projectName --template 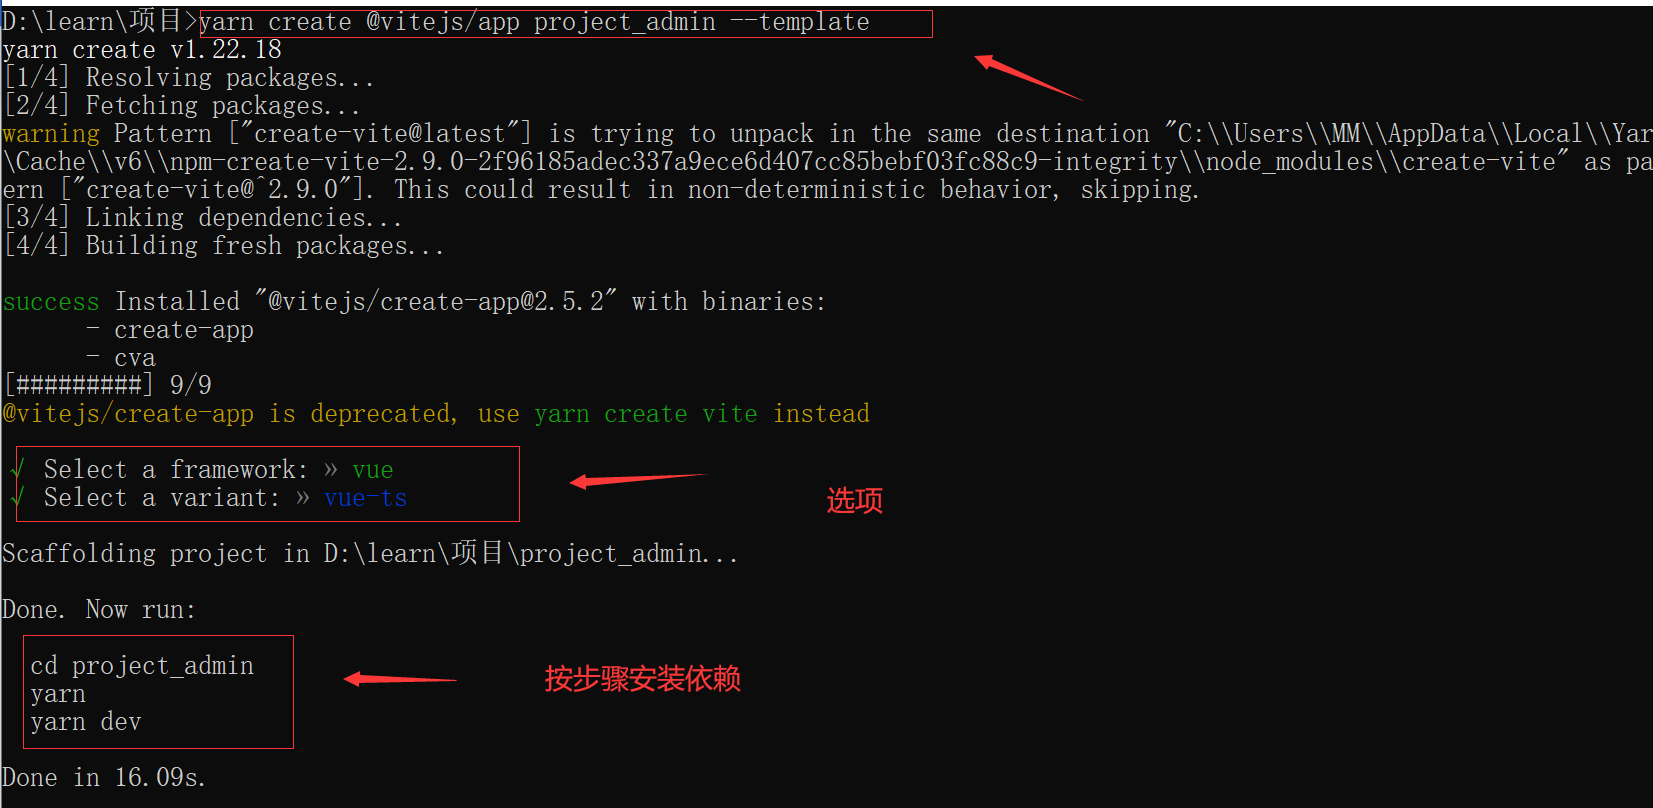
二、安装sass插件
//yarn yarn add sass --dev //npm npm i sass -D 直接使用,不像webpack 还要安装sass-loader
三、安装路由
//npm npm install vue-router //yarn yarn add vue-router - 在 src 文件下新增 router 文件夹 => index.ts 文件
import {
         createRouter, createWebHistory, RouteRecordRaw } from 'vue-router'  const routes: RouteRecordRaw[] = [   {
             path: '/',     name: 'Login',     component: () => import('xxxx'), // 注意在这里带 文件后缀.vue   }, ]  const router = createRouter({
history: createWebHistory(), routes, }) export default router - mian.ts 引入
import {
         createApp } from 'vue'
import App from './App.vue'
import router from './router/index'

const app = createApp(App)

//链式
app.use(router).mount('#app')
四、安装axios
yarn add axios

npm i axios -S
在 src 文件下新增 utils 文件夹,service.ts 和 request.ts 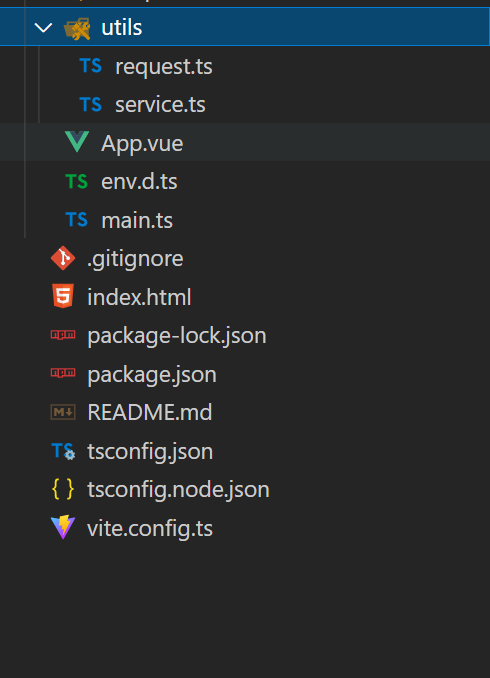
- service.ts:用与创建axios实例,统一配置请求拦截器、响应拦截…
/** * axios 请求配置 */
import axios, {
         AxiosRequestConfig, AxiosResponse } from 'axios'
import {
         ElNotification } from 'element-plus'

/** * 请求失败后的错误统一处理 * @param status 请求失败的状态码 */
const errorHandle = (status: number) => {

    // 状态码判断
    switch (status) {

        case 302: ElNotification.error('接口重定向了!');
            break;
        case 400:
            ElNotification.error("发出的请求有错误,服务器没有进行新建或修改数据的操作==>" + status)
            break;
        // 401: 未登录
        // 未登录则跳转登录页面,并携带当前页面的路径
        // 在登录成功后返回当前页面,这一步需要在登录页操作。
        case 401: //重定向
            ElNotification.error("token:登录失效==>" + status)
            break;
        // 403 token过期
        // 清除token并跳转登录页
        case 403:
            ElNotification.error("登录过期,用户得到授权,但是访问是被禁止的==>" + status)
            break;
        case 404:
            ElNotification.error("网络请求不存在==>" + status)
            break;
        case 406:
            ElNotification.error("请求的格式不可得==>" + status)
            break;
        case 408: ElNotification.error(" 请求超时!")
            break;
        case 410:
            ElNotification.error("请求的资源被永久删除,且不会再得到的==>" + status)
            break;
        case 422:
            ElNotification.error("当创建一个对象时,发生一个验证错误==>" + status)
            break;
        case 500:
            ElNotification.error("服务器发生错误,请检查服务器==>" + status)
            break;
        case 502:
            ElNotification.error("网关错误==>" + status)
            break;
        case 503:
            ElNotification.error("服务不可用,服务器暂时过载或维护==>" + status)
            break;
        case 504:
            ElNotification.error("网关超时==>" + status)
            break;
        default:
            ElNotification.error("其他错误错误==>" + status)
    }
}

//axios创建实例
const service = axios.create({

    //默认地址
    baseURL: "",
    // baseURL: "",
    //请求超时时间
    timeout: 3000,
    //配置请求头
    headers: {
         'Content-Type': 'application/x-www-form-urlencoded;charset=utf-8;' }
});

// 请求拦截器
service.interceptors.request.use((config:AxiosRequestConfig) => {

    //处理业务代码 ex:是否存在token
    return config
}, (error) => {

    // 错误抛到业务代码
    error.data = {
        }
    error.data.msg = '服务器异常,请联系管理员!'
    return Promise.resolve(error)
})

//响应拦截器
service.interceptors.response.use((response: AxiosResponse) => {

    const status = response.status

    if (status < 200 || status >= 300) {

        // 处理http错误,抛到业务代码
        errorHandle(status)
    }
    return response
}, (error) => {

    // 错误抛到业务代码
    error.data = {
        }
    error.data.msg = '请求超时或服务器异常,请检查网络或联系管理员!'
    return Promise.resolve(error)
})

export default service
- request.ts:用于封装get、post、delete、put方法
/** * request 请求封装 */

import service from "./service"

export default {

    get(url: string, data = {
        }) {

        return new Promise((resolve, reject) => {

            service
                .get(url, {
         params: data })
                .then(response => {

                    resolve(response.data);
                })
                .catch(err => {

                    reject(err);
                });
        });
    },
    delete(url: string, data = {
        }) {

        return new Promise((resolve, reject) => {

            service
                .delete(url, {
         params: data })
                .then(response => {

                    resolve(response.data);
                })
                .catch(err => {

                    reject(err);
                });
        });
    },
    post(url: string, data = {
         }) {

        return new Promise((resolve, reject) => {

            service
                .post(url, data)
                .then(response => {

                    resolve(response.data);
                })
                .catch(err => {

                    reject(err);
                });
        });
    },
    put(url: string, data = {
         }) {

        return new Promise((resolve, reject) => {

            service
                .put(url, data)
                .then(response => {

                    resolve(response.data);
                })
                .catch(err => {

                    reject(err);
                });
        });
    }
}
以后发送请求就直接使用,request.ts
五、安装ElementPlus
//NPM
$ npm install element-plus --save
// Yarn
$ yarn add element-plus
- mian.ts 引入
import {
         createApp } from 'vue'
import App from './App.vue'
//引用element-plus
import ElementPlus from 'element-plus'
import 'element-plus/dist/index.css'

const app = createApp(App)

app.use(ElementPlus).mount('#app')
六、安装pinia
npm install pinia --save

yarn add pinia
- 在 src 文件下新增 store文件夹 => index.ts 文件
/** * pinia 创建 */
import {
         createPinia } from 'pinia'
const store = createPinia()
export default store
- mian.ts 引入
import {
         createApp } from 'vue'
import App from './App.vue'
//引入pinia
import store from './store'
const app = createApp(App)
app.use(store).mount('#app')
七、配置vite.config.ts
可以直接复制使用,额外的配置可以自定义。 备注可以信息用不到的,可以删除。
//需要分别安装这两个插件
npm install @types/node --save-dev
//使用 vite-plugin-compression 可以 gzip 或 brotli 的方式来压缩资源,这一步需要服务器端的配合,vite 只能帮你打包出 .gz 文件。此插件使用简单,你甚至无需配置参数,引入即可。
//开启 gzip 可以极大的压缩静态资源,对页面加载的速度起到了显著的作用。
npm install vite-plugin-compression --save-dev
import {
         defineConfig } from 'vite' // 帮手函数,这样不用 jsdoc 注解也可以获取类型提示
import vue from '@vitejs/plugin-vue'  //识别.vue文件
import viteCompression from "vite-plugin-compression"; //gzip必备插件,开启gzip、br压缩

//path
const path = require('path');
/** * * 此时 TS 可能有这个错误提示:找不到模块“path”或其相应的类型声明。 * 解决方法:npm install @types/node --save-dev */

const resolve = (dir: string) => path.join(__dirname, dir)//__dirname 总是指向被执行 js 文件的绝对路径 EX:/d1/d2/myscript.js 文件中写了 __dirname, 它的值就是 /d1/d2

// https://vitejs.dev/config/
export default defineConfig({

  //开发或生产环境服务的公共基础路径
  base: './',
  //作为静态资源服务的文件夹。并在构建期间复制到 outDir 的根目录,并且始终按原样提供或复制而无需进行转换。
  publicDir: "public",
  //用于加载 .env 文件的目录。
  // envDir:"root",
  //控制台输出的级别 info 、warn、error、silent
  logLevel: "info",
  // 设为false 可以避免 vite 清屏而错过在终端中打印某些关键信息
  clearScreen: true,
  //plugins配置需要使用的插件列表
  plugins: [vue(), viteCompression({

    verbose: true,
    disable: false,
    threshold: 10240,
    algorithm: "gzip",
    ext: ".gz",
  })],

  // 路径相关规则
  resolve: {

    //配置别名
    alias: {

      '@': resolve('src'),// @表示当前的src目录路径
      comps: resolve('src/components'),// comps表示当前的src目录路径下components
      apis: resolve('src/apis'),// apis表示当前的src目录路径下apis
      views: resolve('src/views'),
      utils: resolve('src/utils'),
      routes: resolve('src/routes'),
    }
  },
  //配置全局css变量
	// css: {

	// preprocessorOptions: {

	// scss: {

	// additionalData: '@import "@/assets/styles/mixin.scss";',//多个全局样式直接分号引用就行了
	// },
	// },
	// },

  //本地运行配置,以及反向代理配置
  // server: {

  // host: "0.0.0.0",//指定服务器应该监听哪个 IP 地址。 如果将此设置为 0.0.0.0 或者 true 将监听所有地址,包括局域网和公网地址。
  // port: 12138,//指定开发服务器端口
  // strictPort: false, //设为true时端口被占用则直接退出,不会尝试下一个可用端口
  // https: false,//是否启用 http 2
  // open: true,//服务启动时自动在浏览器中打开应用
  // cors: true,//为开发服务器配置 CORS , 默认启用并允许任何源
  // force: true,//是否强制依赖预构建
  // hmr: false,//禁用或配置 HMR 连接
  // // 传递给 chockidar 的文件系统监视器选项
  // watch: {

  // ignored: ["!**/node_modules/your-package-name/**"]
  // },
  // // 反向代理配置
  // proxy: {

  // '/api': {

  // target: "https://xxxx.com/",// 所要代理的目标地址
  // changeOrigin: true,
  // rewrite: (path) => path.replace("/^/api /", '') //重写地址
  // }
  // }
  // },
  //打包配置
  build: {

     //传递给 Terser 的更多 minify 选项。 生产环境去除 console debugger
    terserOptions: {

      compress: {

        drop_console: true,
        drop_debugger: true,
      },
    },

  // //浏览器兼容性 "esnext"|"modules"
  // target: "modules",
  // //指定输出路径
  // outDir: "dist",
  // //生成静态资源的存放路径
  // assetsDir: "assets",
  // //小于此阈值的导入或引用资源将内联为 base64 编码,以避免额外的 http 请求。设置为 0 可以完全禁用此项
  // assetsInlineLimit: 4096,
  // //启用/禁用 CSS 代码拆分
  // cssCodeSplit: true,
  // //构建后是否生成 source map 文件
  // sourcemap: false,
  // //自定义底层的 Rollup 打包配置
  // rollupOptions: {

  // },
  // //@rollup/plugin-commonjs 插件的选项
  // commonjsOptions: {

  // },
  // //构建的库
  // lib: {

  // },
  // //当设置为 true,构建后将会生成 manifest.json 文件
  // manifest: false,
  // // 设置为 false 可以禁用最小化混淆,
  // // 或是用来指定使用哪种混淆器
  // // boolean | 'terser' | 'esbuild'
  // minify: "terser", //terser 构建后文件体积更小
  // //设置为 false 来禁用将构建后的文件写入磁盘
  // write: true,
  // //默认情况下,若 outDir 在 root 目录下,则 Vite 会在构建时清空该目录。
  // emptyOutDir: true,
  // //启用/禁用 brotli 压缩大小报告
  // brotliSize: true,
  // //chunk 大小警告的限制
  // chunkSizeWarningLimit: 500
  },
})

/*** * 注意事项: */
// ● 假设不配置 base 时,打包之后,访问时出现白屏。
// ● alias 不配置的时候,每次引入文件需要找根目录,比较麻烦。
八、环境变量配置
项目根目录分别新建:.env 、.env.development 、.env.production 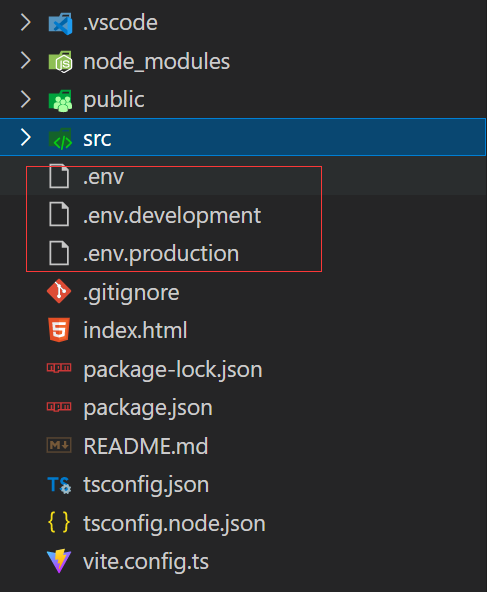
- .env
# port 端口号
VITE_PORT = 8888

# open 运行 npm run dev 时自动打开浏览器
VITE_OPEN = false

# public path 配置线上环境路径(打包)、本地通过 http-server 访问时,请置空即可
VITE_PUBLIC_PATH = ''
- .env.developmen
# 本地环境
ENV = 'development'

# 本地环境接口地址
VITE_API_URL = 'http://localhost:8888/'
- .env.production
# 线上环境
ENV = 'production'

# 线上环境接口地址
VITE_API_URL = 'URL'
使用:
console.log(import.meta.env.VITE_API_URL)
//输入命令 npm run dev 系统会识别.env.developmen文件下的VITE_API_URL地址
//输入命令 npm run build 系统会识别.env.production文件下的VITE_API_URL地址
九、约束代码风格
- Eslint 支持
- 下载依赖
# eslint 安装
yarn add eslint --dev
# eslint 插件安装
yarn add eslint-plugin-vue --dev

yarn add @typescript-eslint/eslint-plugin --dev

yarn add eslint-plugin-prettier --dev

# typescript parser
yarn add @typescript-eslint/parser --dev
注意: 如果 eslint 安装报错:
可以尝试运行以下命令:
yarn config set ignore-engines true
- 在根目录下新建 .eslintrc.js
//配置 eslint 校验规则: module.exports = { root: true, env: { browser: true, node: true, es2021: true, }, parser: 'vue-eslint-parser', extends: [ 'eslint:recommended', 'plugin:vue/vue3-recommended', 'plugin:@typescript-eslint/recommended', 'plugin:prettier/recommended', // eslint-config-prettier 的缩写 'prettier', ], parserOptions: { ecmaVersion: 12, parser: '@typescript-eslint/parser', sourceType: 'module', ecmaFeatures: { jsx: true, }, }, // eslint-plugin-vue @typescript-eslint/eslint-plugin eslint-plugin-prettier的缩写 plugins: ['vue', '@typescript-eslint', 'prettier'], rules: { '@typescript-eslint/ban-ts-ignore': 'off', '@typescript-eslint/no-unused-vars': 'off', '@typescript-eslint/explicit-function-return-type': 'off', '@typescript-eslint/no-explicit-any': 'off', '@typescript-eslint/no-var-requires': 'off', '@typescript-eslint/no-empty-function': 'off', '@typescript-eslint/no-use-before-define': 'off', '@typescript-eslint/ban-ts-comment': 'off', '@typescript-eslint/ban-types': 'off', '@typescript-eslint/no-non-null-assertion': 'off', '@typescript-eslint/explicit-module-boundary-types': 'off', 'vue/multi-word-component-names': 'off', 'no-var': 'error', 'prettier/prettier': 'error',