一、基本概念
-
端元:构成混合像元的纯地物称为端元;
-
混合像元的原因:
-
采样频率小于或等于地表空间变异频率,使单像元对应地面面积较大, 因此,它包含多种地物类型;
-
传感器的空间分辨率与地表的变异程度相比过于精细, 使一些像元不可避免地跨越地物边界。
-
-
确定端元类型的方法:
- 从光谱库中选择;
- 直接从图像上提取;
- 结合从光谱库和图像中提取的波谱,首先从图像中选择相对单一的像元光谱,然后分解光谱,通过比较光谱库中的光谱来确定端元的类型和波谱值。
-
最大噪声比变化(MNF):连续使用主成分分析(PCA)对高光谱遥感数据进行压缩和降维的方法。
- 通过引入噪声协方差矩阵来估计噪声比;
- 首先,协方差矩阵通过某种方式(如高通滤波图像)获得噪声;
- 然后对角度和标准化噪声协方差矩阵,获得图像转换矩阵,实现噪声去相关和标准化,即图像转换后包含的噪声在各波段上方的差异 而且不相关;
- 最后,将变换后的图像转换为主成分,从而实现 MNF 此时获得的图像主成分的解释方差对应于主成分的信噪比。
-
像元纯度指数(PPI):它是表示多波段遥感图像中每个像元纯度的指标。值越大,相应的像元越接近纯像元。
- 它将 N 维像元点投影到一个随机的单位向量如果像元纯度较大,则应更接近单位向量的端点,否则位于单位向量的内部。
- 经过投影方式迭代多次后,纯度大的像元靠近端点的概率值大, 纯度小的像元靠近端点的概率值小, 因此,可以获得反映端元纯度的图像。
二、操作步骤
1. 下载并处理 Sentinel 数据
参考:Be-Zero/Sentinel2_pretreatment
2. 计算 NDVI
-
提取 NIR 波段和 R 波段:
-
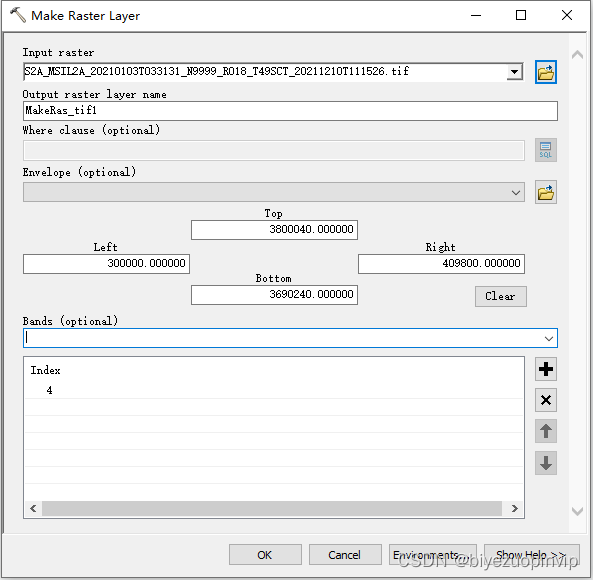
Arcgis 工具为:Data Management Tools/Layers and Table Views/Make Raster Layer;
-
R 波段为 band 1,NIR 波段为 band 4;
-
-
NDVI 计算:
-
Arcgis 工具:Spatial Analyst Tools/Map Algebra/Raster Calculator;
-
NDVI 公式为 N I R ? R N I R R \frac{NIR-R}{NIR R} NIR RNIR?R ;
-
格栅计算器公式为
("NIR.tif" - "R.tif") / ("NIR.tif" "R.tif");
-
-
批量提取波段
-
使用 arcpy 批量提取波段,需要注意的是,arcgis 版本需为 10.7 否则,在保存网格数据时可能会出错:www.biyezuopin.vip
# coding:utf-8 import arcpy from arcpy.sa import * import os def get_R(out_path): files = arcpy.ListRasters("*", "tif") # 查找目录中的 tif 格式文件 for file in files: # 遍历 try: arcpy.MakeRasterLayer_management(file, "red", band_index="1") # 提取 R 波段 Raster("red").save(out_path + os.sep + file) print file + " is done!" # 完成提示 except: print file + " has a bug." # 筛选出错误文件 def get_B(out_path): files = arcpy.ListRasters("*", "tif") # 查找目录中的 tif 格式文件 for file in files: # 遍历 try: arcpy.MakeRasterLayer_management(file, "blue", band_index="3") # 提取 B 波段 Raster("blue").save(out_path + os.sep + file) print file + " is done!" # 完成提示 except: print file + " has a bug." # 筛选出错误文件 def get_G(out_path): files = arcpy.ListRasters("*", "tif") # 查找目录中的 tif 格式文件 for file in files: # 遍历 try: arcpy.MakeRasterLayer_management(file, "green", band_index="2") # 提取 G 波段 Raster("green").save(out_path + os.sep + file) print file + " is done!" # 完成提示 except: print file + " has a bug." # 筛选出错误文件 def get_NIR(out_path): files = arcpy.ListRasters("*", "tif") # 查找目录中的 tif 格式文件 for file in files: # 遍历 try: arcpy.MakeRasterLayer_management(file, "nir", band_index="4") # 提取 NIR 波段 Raster("nir").save(out_path + os.sep + file) print file + " is done!" # 完成提示 except: print file + " has a bug." # 筛选出错误文件 def get_VRE1(out_path): files = arcpy.ListRasters("*", "tif") # 查找目录中的 tif 格式文件 for file in files: # 遍历 try: arcpy.MakeRasterLayer_management(file, "vre1", band_index="1") # 提取 VRE1 波段 arcpy.Resample_management(Raster("vre1"), out_path + os.sep + file, 10, "NEAREST") # 对波段上采样 print file + " is done!" # 完成提示 except: print file + " has a bug." # 筛选出错误文件 def get_VRE2(out_path): files = arcpy.ListRasters("*", "tif") # 查找目录中的 tif 格式文件 for file in files: # 遍历 try: arcpy.MakeRasterLayer_management(file, "vre2", band_index="2") # 提取 VRE2 波段 arcpy.Resample_management(Raster("vre2"), out_path + os.sep + file, 10, "NEAREST") # 对波段上采样 print file + " is done!" # 完成提示 except: print file + " has a bug." # 筛选出错误文件 def get_VRE3(out_path): files = arcpy.ListRasters("*", "tif") # 查找目录中的 tif 格式文件 for file in files: # 遍历 try: arcpy.MakeRasterLayer_management(file, "vre3", band_index="3") # 提取 VRE3 波段 arcpy.Resample_management(Raster("vre3"), out_path + os.sep + file, 10, "NEAREST") # 对波段上采样 print file + " is done!" # 完成提示 except: print file + " has a bug." # 筛选出错误文件 def get_NN(out_path): files = arcpy.ListRasters("*", "tif") # 查找目录中的 tif 格式文件 for file in files: # 遍历 try: arcpy.MakeRasterLayer_management(file, "nn", band_index="4") # 提取 NN 波段 arcpy.Resample_management(Raster("nn"), out_path + os.sep + file, 10, "NEAREST") # 对波段上采样 print file + " is done!" # 完成提示 except: print file + " has a bug." # 筛选出错误文件 def get_SWIR1(out_path): files = arcpy.ListRasters("*", "tif") # 查找目录中的 tif 格式文件 for file in files: # 遍历 try: arcpy.MakeRasterLayer_management(file, "swir1", band_index="6") # 提取 SWIR1 波段 arcpy.Resample_management(Raster("swir1"), out_path + os.sep + file, 10, "NEAREST") # 对波段上采样 print file + " is done!" # 完成提示 except: print file + " has a bug." # 筛选出错误文件 def get_SWIR2(out_path): files = arcpy.ListRasters("*", "tif") # 查找目录中的 tif 格式文件 for file in files: # 遍历 try: arcpy.MakeRasterLayer_management(file, "swir2", band_index="5") # 提取 SWIR2 波段 arcpy.Resample_management(Raster("swir2"), out_path + os.sep + file, 10, "NEAREST") # 对波段上采样 print file + " is done!" # 完成提示 except: print file + " has a bug." # 筛选出错误文件 def get_C(out_path): files = arcpy.ListRasters("*", "tif") # 查找目录中的 tif 格式文件 for file in files: # 遍历 try: arcpy.MakeRasterLayer_management(file, "c", band_index="1") # 提取 C 波段 arcpy.Resample_management(Raster("c"), out_path + os.sep + file, 10, "NEAREST") # 对波段上采样 print file + " is done!" # 完成提示 except: print file + " has a bug." # 筛选出错误文件 def get_WV(out_path): files = arcpy.ListRasters("*", "tif") # 查找目录中的 tif 格式文件 for file in files: # 遍历 try: arcpy.MakeRasterLayer_management(file, "wv", band_index="2") # 提取 WV 波段 arcpy.Resample_management(Raster("wv"), out_path + os.sep + file, 10, "NEAREST") # 对波段上采样 print file + " is done!" # 完成提示 except: print file + " has a bug." # 筛选出错误文件 if __name__ == "__main__": arcpy.CheckOutExtension("spatial") # 检查工具箱 in_path_data1 = r"D:\Documentation\Project\Grassland ecology\NDVI_DFI_model\data\Sentinel-2\data1" # 输入文件路径 in_path_data2 = r"D:\Documentation\Project\Grassland ecology\NDVI_DFI_model\data\Sentinel-2\data2" # 输入文件路径 in_path_data3 = r"D:\Documentation\Project\Grassland ecology\NDVI_DFI_model\data\Sentinel-2\data3" # 输入文件路径 C_path = r"D:\Documentation\Project\Grassland ecology\NDVI_DFI_model\data\band\C" # 输出文件路径 B_path = r"D:\Documentation\Project\Grassland ecology\NDVI_DFI_model\data\band\G" # 输出文件路径 G_path = r"D:\Documentation\Project\Grassland ecology\NDVI_DFI_model\data\band\B" # 输出文件路径 R_path = r"D:\Documentation\Project\Grassland ecology\NDVI_DFI_model\data\band\R" # 输出文件路径 VRE1_path = r"D:\Documentation\Project\Grassland ecology\NDVI_DFI_model\data\band\VRE1" # 输出文件路径 VRE2_path = r"D:\Documentation\Project\Grassland ecology\NDVI_DFI_model\data\band\VRE2" # 输出文件路径 VRE3_path = r"D:\Documentation\Project\Grassland ecology\NDVI_DFI_model\data\band\VRE3" # 输出文件路径 NIR_path = r"D:\Documentation\Project\Grassland ecology\NDVI_DFI_model\data\band\NIR" # 输出文件路径 NN_path = r"D:\Documentation\Project\Grassland ecology\NDVI_DFI_model\data\band\NN" # 输出文件路径 WV_path = r"D:\Documentation\Project\Grassland ecology\NDVI_DFI_model\data\band\WV" # 输出文件路径 SWIR1_path = r"D:\Documentation\Project\Grassland ecology\NDVI_DFI_model\data\band\SWIR1" # 输出文件路径 SWIR2_path = r"D:\Documentation\Project\Grassland ecology\NDVI_DFI_model\data\band\SWIR2" # 输出文件路径 arcpy.env.workspace = in_path_data1 # 设置当前工作目录 print "begin to get R band:" get_R(R_path) print "begin to get G band:" get_G(G_path) print "begin to get B band:" get_B(B_path) print "begin to get NIR band:" get_NIR(NIR_path) arcpy.env.workspace = in_path_data2 # 设置当前工作目录 print "begin to get SWIR1 band:" get_SWIR1(SWIR1_path) print "begin to get SWIR2 band:" get_SWIR2(SWIR2_path) print "begin to get VRE1 band:" get_VRE1(VRE1_path) print "begin to get VRE2 band:" get_VRE2(VRE2_path) print "begin to get VRE3 band:" get_VRE3(VRE3_path) print "begin to get NN band:" get_NN(NN_path) arcpy.env.workspace = in_path_data3 # 设置当前工作目录 print "begin to get C band:" get_C(C_path) print "begin to get WV band:" get_WV(WV_path) -
代码中 data1 数据就是 sentinel-2 数据转换后的第一个子数据集,data2 为第二个子数据集。
-
-
NDVI 批量计算
-
利用上一步提取的波段进行计算:
# coding:utf-8
import arcpy
from arcpy.sa import *
import os

arcpy.CheckOutExtension("spatial") # 检查工具箱

in_path_R = r"D:\Documentation\Project\Grassland ecology\NDVI_DFI_model\data\band\R" # 输入文件路径
in_path_NIR = r"D:\Documentation\Project\Grassland ecology\NDVI_DFI_model\data\band\NIR" # 输入文件路径
out_ndvi_path = r"D:\Documentation\Project\Grassland ecology\NDVI_DFI_model\data\NDVI" # 输出文件路径

arcpy.env.workspace = in_path_R # 设置当前工作目录

files = arcpy.ListRasters("*", "tif") # 查找目录中的 tif 格式文件
for file in files: # 遍历
    try:
        ndvi = (Raster(in_path_NIR + os.sep + file) - Raster(in_path_R + os.sep + file)) / (Raster(in_path_NIR + os.sep + file) + Raster(in_path_R + os.sep + file)) # 计算 ndvi 指数
        ndvi.save(out_ndvi_path + os.sep + file) # 将 ndvi 指数存为 tif 格式
        print file + " is done!" # 完成提示
    except:
        print file + " has a bug." # 筛选出错误文件
-
-
DFI 计算
-
提取 SWIR1 和 SWIR2 ,步骤与 NDVI 中 R 波段和 NIR 波段的方法相同,只不过 SWIR1 波段是 band6 ,SWIR2 波段是 band5 ;第三步已批量提取该章节所使用的波段。
-
计算步骤与 NDVI 的计算步骤相同,只需改变公式即可:
-
DFI 计算公式: D F I = 100 × ( 1 − S W I R 1 S W I R 2 ) × R N I R DFI=100\times\left(1-\frac{SWIR1}{SWIR2}\right)\times\frac{R}{NIR} DFI=100×(1−SWIR2SWIR1)×NIRR ;
-
栅格计算器公式:
100*(1-SWIR1.tif/SWIR2.tif)*R.tif/NIR.tif;
-
-
python 批量处理:
# coding:utf-8 import arcpy from arcpy.sa import * import os arcpy.CheckOutExtension("spatial") # 检查工具箱 in_path_R = r"D:\Documentation\Project\Grassland ecology\NDVI_DFI_model\data\band\R" # 输入文件路径 in_path_NIR = r"D:\Documentation\Project\Grassland ecology\NDVI_DFI_model\data\band\NIR" # 输入文件路径 in_path_SWIR1 = r"D:\Documentation\Project\Grassland ecology\NDVI_DFI_model\data\band\SWIR1" # 输入文件路径 in_path_SWIR2 = r"D:\Documentation\Project\Grassland ecology\NDVI_DFI_model\data\band\SWIR2" # 输入文件路径 out_dfi_path = r"D:\Documentation\Project\Grassland ecology\NDVI_DFI_model\data\DFI" # 输出文件路径 tmp_path = r"D:\Documentation\Project\Grassland ecology\NDVI_DFI_model\data\TMP" arcpy.env.workspace = in_path_R # 设置当前工作目录 files = arcpy.ListRasters("*", "tif") # 查找目录中的 tif 格式文件 arcpy.env.workspace = tmp_path # 设置当前工作目录 for file in files: # 遍历 try: SWIR1 = Raster(in_path_SWIR1 + os.sep + file) # 读取波段 SWIR2 = Raster(in_path_SWIR2 + os.sep + file) # 读取波段 NIR = Raster(in_path_NIR + os.sep + file) # 读取波段 R = Raster(in_path_R + os.sep + file) # 读取波段 left = int(arcpy.GetRasterProperties_management(SWIR1, "LEFT").getOutput(0)) # 读取图像位置范围 bottom = int(arcpy.GetRasterProperties_management(SWIR1, "BOTTOM").getOutput(0)) # 读取图像位置范围 right = int(arcpy.GetRasterProperties_management(SWIR1, "RIGHT").getOutput(0)) # 读取图像位置范围 top = int(arcpy.GetRasterProperties_management(SWIR1, "TOP").getOutput(0)) # 读取图像位置范围 ones = CreateConstantRaster(1, "FLOAT", 20, Extent(left, bottom, right, top)) # 创建常量栅格 dfi = 100 * (ones - SWIR1 / SWIR2) * R / NIR # 计算 dfi dfi.save(out_dfi_path + os.sep + file) # 将 dfi 指数存为 tif 格式 print file + " is done!" # 完成提示 except: print file + " has a bug." # 筛选出错误文件 -
特别注意:
-
由于 Sentinel-2 数据在最开始提取的时候未进行上采样,因此不同波段的像素大小是不同的,故不可直接进行计算,解决方法有两种:第一种是使用 snap 软件中某些工具直接对 Sentinel-2 数据进行采样,然后再将数据转换为 TIFF 格式处理;第二种是在计算过程中应用 arcpy 的重采样工具进行采样;本文使用第二种方法,因此采样的效果可能不如第一种方法。
-
由于栅格计算器不能直接将常量与栅格进行计算,因此需要手动生成一个常量栅格后再进行计算,可以使用 arcpy 中的方法来实现。
-
在代码中读取图像位置范围是因为不同的图像其范围有差异,因此在生成常量栅格时应按需调整相关参数。
-
-
三、纯净像元指数法
根据参考文献 [2] 中的方法,首先需要绘制一张以 NDVI 为 x 轴,DFI 为 y 轴的散点图观察两种指数分布的趋势。
利用 ENVI 软件中的 display/2D Scatter Plot 工具,选择 x 轴为 NDVI ,y 轴为 DFI ,此处取一张图像为例,效果图如下:
从图中大致可以看出,两种指数的分布呈现为一个三角形。
接下来使用纯净像元指数法提取特征端元,首先需要将所有波段进行融合,为后续的 MNF 最小噪声分离变换做准备:
# coding:utf-8 import arcpy from arcpy.sa import * import os arcpy.CheckOutExtension("spatial") # 检查工具箱 in_path_R = r"D:\Documentation\Project\Grassland ecology\NDVI_DFI_model\data\band\R" # 输入文件路径 in_path_NIR = r"D:\Documentation\Project\Grassland ecology\NDVI_DFI_model\data\band\NIR" # 输入文件路径 in_path_SWIR1 = r"D:\Documentation\Project\Grassland ecology\NDVI_DFI_model\data\band\SWIR1" # 输入文件路径 in_path_SWIR2 = r"D:\Documentation\Project\Grassland ecology\NDVI_DFI_model\data\band\SWIR2" # 输入文件路径 in_path_C = 标签:1212s2to接近传感器